


How To Make Panda Sushi That’s Almost Too Cute To Eat
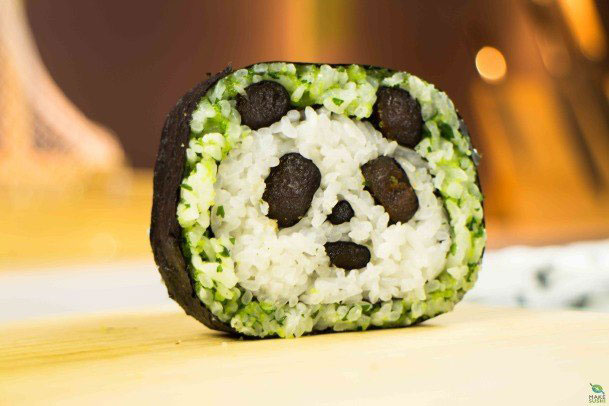
Sometimes, it can be difficult to get kids to try new foods like sushi. What if, however, that piece of sushi looked as whimsical as this Panda roll? Make Sushi, known for creating beautiful works of art contained within a sushi roll, has created a roll resembling the adorable South China bear.
All you need is a few basic ingredients: a small piece of sushi grade tuna, several Nori sheets, some cooked sushi rice, 2 heaped tablespoons of wasabi masago and 1 heaped tablespoon of chopped coriander.
Cut the tuna into four slices: two 1 cm and two 0.5 cm in thickness. Marinate the slices in a bowl of soy sauce for 30 minutes to an hour. Definitely no more than an hour or the tuna will harden.
Add the 2 tablespoons of wasabi masago to the cooked sushi rice. Then, add the chopped coriander and gently mix together with the rice and masago. Make sure the ingredients are spread evenly into the mixture. Once you’re down, set it aside.

Remove the tuna from the fridge and cut to appropriate thickness for the eyes (bigger), nose and mouth (smaller). Horizontally lay down a sheet of nori and place the first tuna strip at the edge of the nori sheet. Wrap the nori around the fish, covering the whole strip and cut off the excess nori.
Keep repeating this until you have six different strips: two parts, two eyes, a nose and a mouth.
With a new sheet of nori, add a small handful of sushi at the center and spread it into an oblong shape. Make sure the rice touches the top and bottom of the nori.
Place a think strip of wrapped tuna flat in the middle of the rice for the mouth. Then, add a think layer of rice on top of the tuna strip covering the strip. Repeat the step with another thin tuna strip.
Now, place the two thick tuna strips on top of the column to make the eyes of the panda. Then, add more rice between the two strips. Carefully mold the column with white rice to make sure that the panda has a round face.
Make Sushi says to now take one side of the nori and curl it up and around the column of rice. Repeat the step with the other side so that the two sides overlap at the top. Compress the roll with your hands gently rolling into a circular shape. Set that aside.
Taking two sheets of nori, lay them horizontally. Then, glue the sheets together by putting a thin column of sushi rice on the edge of one of the sheets and sticking it with the other nori sheet.
Now, take the GREEN sushi rice and cover about 3/4 of the large nori sheet with it. Be careful so that it stays light and fluffy.
Using two chopsticks, press them to the center of the green rice (two centimeters apart). Now, remove the chopsticks. You should have two grooves that you can now place the last two pieces of rolled tuna inside. These are the panda ears.
Place your panda face roll on top of the ears you just made. Make sure the eyes are at the bottom next to the ears.
Now, dip a sharp knife in som cold water (so it doesn’t stick to the rice), then carefully cut the roll with as little motion as possible. Cut off each end of the roll first, then section off your panda sushi in whatever thickness you want.
Mostly, the recipe is just stacking and careful rolling. You can get a play-by-play of the exact process in the video above.