


Ermahgerd, There’s Such a Thing as Bacon-wrapped Sushi — Here’s How to Make It
As so deftly described by recipe creator Cathy Bouchard (instructables tag: skyisblu), sushi is the “perfect combination of tastes” – sweet and salty and tangy and fresh – and now apparently made even better by trading the crispy sheets of seaweed for crispier, saltier strips of bacon.
Kanpai.
Bacon Wrapped Risotto Sushi
Ingredients/Tools:
(Makes enough for 2 – 4 people)
- 2 500g (1 lb.) packages of bacon
- 3 tbsp. oil
- 1 medium onion, finely diced
- 1 1/2 c. sushi rice
- 3/4 c. white wine (replace with chicken stock for a version without alcohol)
- 4 1/2 c. chicken stock
- 2 tbsp. butter
- 3/4 c. grated Parmesan cheese
- bamboo sushi rolling mat
- roasting pan with drip tray to cook the bacon (can be replaced by a cooling rack placed on a baking sheet)
- thick-bottomed cast iron pot
Step 1: Bacon Nori

Preheat the oven to 350 degrees F.
Lay half a package of bacon on the rack of the roasting pan, then bake for 10 minutes. Turn the bacon strips over, then continue cooking for another 10 minutes. The idea is to cook the bacon slightly less than crispy, as the strips need to remain pliable enough to be rolled into a maki.
Once cooked, transfer the bacon strips to a plate to cool, and repeat the cooking process with the remaining bacon. Set the cooked bacon aside.
Step 2: Risotto Filling

First, you have to prepare the stove-top for risotto-making: place the heavy-bottomed pot to cook in on the front burner of the stove, then put the saucepan for the stock on the back burner. Pour the stock into the saucepan and bring to a simmer over medium-low heat. Adding hot stock to the dish will keep the risotto cooking evenly. Adding cold stock would only slow down the cooking process.
In the large, heavy-bottomed pot, heat the oil over medium heat. Add the onion and sauté until translucent, about 5 minutes.
Add the rice to the pot and stir until coated in the oil, about 1 minute.
Add the wine and cook, stirring, until the liquid has been absorbed.
Begin adding the stock to the rice, one ladle at a time, allowing the liquid to be completed absorbed before the next addition, while stirring constantly to prevent the rice from sticking. Keep adding stock to the rice until all the stock has been used up, the rice is cooked and the risotto is creamy.
Remove from heat and stir in the butter and Parmesan cheese. Set aside until ready to assemble the sushi rolls.
(Look here for more risotto customization tips, such as adding mushrooms or green peas and ham)
Step 4: Rolling the Sushi

Cover the sushi rolling mat with a large piece of aluminum foil as protection from the risotto and bacon grease. (You don’t want your next sushi dinner tasting like bacon. Or maybe you do…) Lay the strips of bacon vertically over the mat, making sure they all touch to create a “sheet” of bacon “nori”. Cover the half closest to you with a layer of risotto, about 1/2 inch thick.
Using the aluminum foil and rolling mat as guides, pull the edge of the bacon roll up and over itself, to begin rolling the sushi. Push the end down and into the rice, and the bacon should start curling in on itself. Work your way along the roll, pushing the bacon in on itself while pulling the aluminum and sushi mat away, creating a tight roll. Once you get to the end of the bacon, check the roll. If there is too much filling, it will be squishing out by now, and you can remove it to make a cleaner roll. You should now have one complete bacon sushi roll. Roll the sushi in the aluminum foil, close the ends, and set it aside. Lay a fresh piece of aluminum foil over the rolling mat and continue using the rest of the bacon and risotto until you have 4 complete sushi rolls.
Step 5: Baking and Slicing

Preheat the oven to 350 degrees F. Place the aluminum foil-covered sushi rolls in the oven and bake for 20 minutes. This will warm all the ingredients and crisp the bacon a little more. It will also melt any cheese fillings you may have decided to add to your rolls.
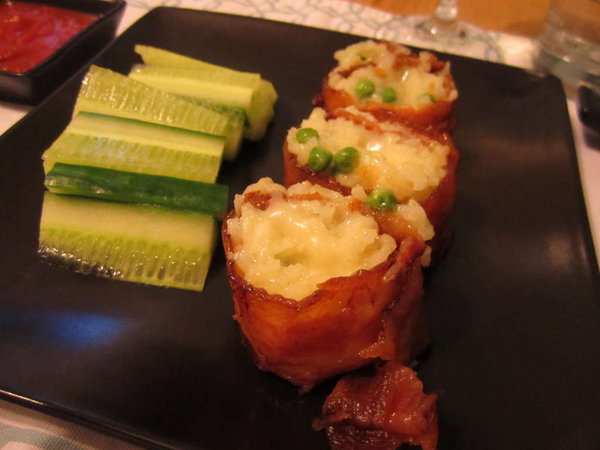
Remove from the oven and unwrap one roll on a cutting board, Using a sharp knife, cut the maki in between each bacon strip. Place the cut pieces onto a platter for serving. Continue until you have cut all the maki pieces.
Step 6: Serve!


Serve the sushi with a light crispy vegetable side dish, such as refreshing cucumber sticks, or a green salad. White wine makes an excellent compliment to the meal, especially if it is the same wine used in the risotto. If you like to dip, I suggest a nice marinara sauce, warmed slightly, but the sushi is also great by itself.
—
So it’s not strictly “sushi,” but this bacon-wrapped recipe definitely looks and sounds unbelievably tasty. What do you guys think? Plan on trading out your favorite nori for pork parts any time soon?
[All photo and recipe credit: Cathy Bouchard]